

Landing gear and lift strut attachment fittings……Wow! I had been avoiding this because I knew it would be difficult ………………… and it was, I’m still not done but the hardest part is finished. The last post I showed pictures of my fittings. With the help of Tom at Wag Aero and lots of advice from other builders, I formulated a plan. I took the advice of another builder and decided to build my cabane before welding any fittings in place. This was a fairly normal fabrication, although particular attention was needed to keep the bushings properly lined up. The pictures to follow will show how I did that step. With the cabane finished, the next step was to weld together the two pieces that make up the lift strut fitting and weld that on to the fuselage. More on the welding latter. With the lift strut fitting in place I am now ready to attach the gear fittings. My plan here is to weld the bushings to the u brackets first then attach the gear and cabane as a jig and try to clamp all the parts in place as a jig before tack and final welding. I will update and post pictures as I go along.
Back to the lift strut fittings. This was the hardest welding I have ever done! Welding the plates together was easy. Fitting the plate to the fuselage at the proper angle was very time consuming. It took me about 2 hours or so for each side. The fitting needs to be at 22.2 degrees relative to the cross tube for the 2+2, with the attachment holes for the lift strut 5/8″ on center to the longeron, and the fitting parallel to the front lower longeron! I went and bought a digital level and what a good thing that was. With out it, no way could I have gotten it correct. I would up lightly tack welding it in place with some clamps, measuring, heating, tapping with a hammer, measuring, heating, tapping………..well you have the picture. When satisfied, I welded the outside of the fitting. Pretty easy although it took a lot of heat. The inside was another story.
The fillet weld inside is was difficult, lots of heat needed. I used a # 5 Harris tip and first pre heated the fitting from the back side until the inside was red. Then, I started inside on the top side. I started working the weld from the top ear of the fitting, concentrating the heat on the plate and letting the heat transfer up the tube to create the puddle. I kept the flame on the puddle and the plate to avoid burning through the tube. The corner is the hardest because the tip tends to over heat and cause the flame to pop. I had to stop and let the torch cool because of the excess heat build up a couple of times. It took a lot of work and heat to control the flow into the fillet. I had to keep going back and working the puddle into the fillet with the heat on the plate. At one point, my glove was on fire from the heat and with two layers including a welding jacket my stomach was red like a bad sunburn. It took me about 45 minutes for each side. I did not have any warpage because of the cluster and a foot away, the other tubes were hot but I was able to rest my gloved arm on it with out any burning. This definitely was the hardest weld to date.
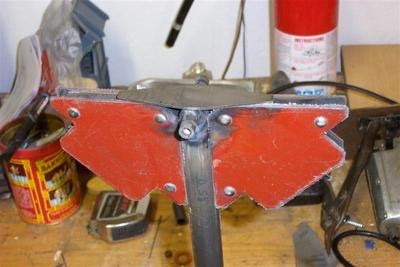
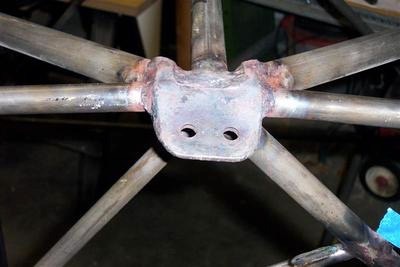
Ok, now for some pictures. The first picture is of the finished lift strut welded in place. Below that, I have the steps in order from the cabane through the lift strut fittings.
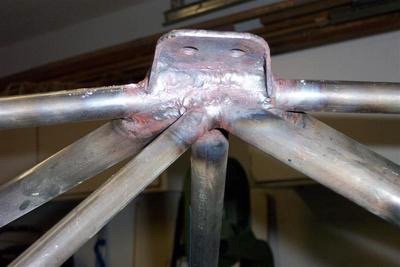 Finished lift strut
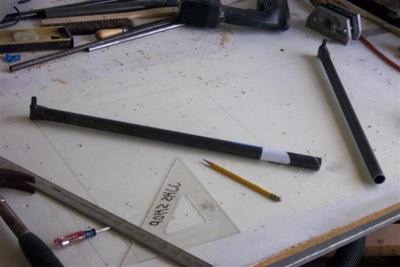
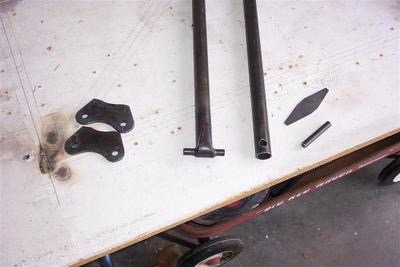 These
are the cabane parts I made up. The plate with the two holes was
fabricated from two .090 pieces each welded together. To keep the holes
aligned, I tack welded all 4 pieces together as rectangles and drilled the
two holes. Then I removed the tack welds and I had four rectangles with
two holes each. Then, I cut to shape each piece and bolted two together
and edge welded together and repeated for then welded the two remaining for the
second piece. You will see that the bushing I welded in is extra long and
will be cut to length later. I have found that the ends burn when welding
and need to be cut off latter any way.
These
are the cabane parts I made up. The plate with the two holes was
fabricated from two .090 pieces each welded together. To keep the holes
aligned, I tack welded all 4 pieces together as rectangles and drilled the
two holes. Then I removed the tack welds and I had four rectangles with
two holes each. Then, I cut to shape each piece and bolted two together
and edge welded together and repeated for then welded the two remaining for the
second piece. You will see that the bushing I welded in is extra long and
will be cut to length later. I have found that the ends burn when welding
and need to be cut off latter any way.
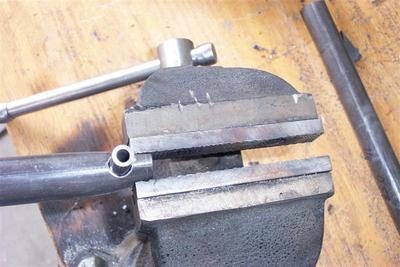 You
can see that I first drilled a hole and squeezed the tube around the bushing.
You
can see that I first drilled a hole and squeezed the tube around the bushing.
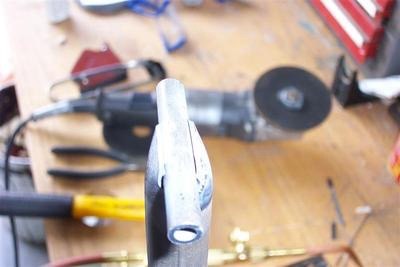 Here
I have cut away end of the tube and am ready to weld on the finger strap.
Here
I have cut away end of the tube and am ready to weld on the finger strap.
 The
finger strap is ready for the top weld. Do not forget to weld the bushing
underneath the finger strap BEFORE you weld on the strap.
The
finger strap is ready for the top weld. Do not forget to weld the bushing
underneath the finger strap BEFORE you weld on the strap.
 The
strap was first tack welded in place then bent around the tube then welded all
around. You can see the finished finger strap above a couple of pictures
with all the parts.
The
strap was first tack welded in place then bent around the tube then welded all
around. You can see the finished finger strap above a couple of pictures
with all the parts.
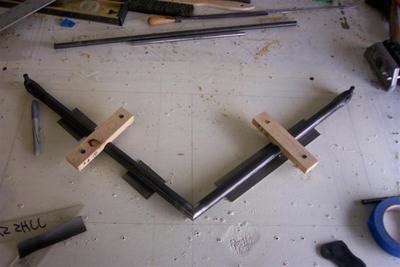
 Next,
alignment and fitting. I drew all the lines on my table and drilled holes
for the bushings to fit into the table. This allowed me to keep the holes
aligned with each other and 90 degrees to the lower fitting when later welded
on.
Next,
alignment and fitting. I drew all the lines on my table and drilled holes
for the bushings to fit into the table. This allowed me to keep the holes
aligned with each other and 90 degrees to the lower fitting when later welded
on.
 Ready
to weld. I tacked first, then removed and welded in my vice. Be
prepared for some spring back when cool. I had to heat a couple of times
an fit back into table to get distance between bushings correct. I am
with in 1/16″ of correct measurement.
Ready
to weld. I tacked first, then removed and welded in my vice. Be
prepared for some spring back when cool. I had to heat a couple of times
an fit back into table to get distance between bushings correct. I am
with in 1/16″ of correct measurement.
 And
the finished cabane.
And
the finished cabane.
 Below
are two plates bolted together and edge welded all the way around ready for
placement.
Below
are two plates bolted together and edge welded all the way around ready for
placement.
 I
welded the bottom side first. I don’t have ant great way of jigging this
in place, just use some “C” clamps and magnets to hold in place.
This was easy welding compared to the inside.
I
welded the bottom side first. I don’t have ant great way of jigging this
in place, just use some “C” clamps and magnets to hold in place.
This was easy welding compared to the inside.
And
the fillet weld! As I stated above, this was very difficult.
Landing gear fittings are next.
Return to Past Posts and Pictures by Date