

Drilling Wing Spars
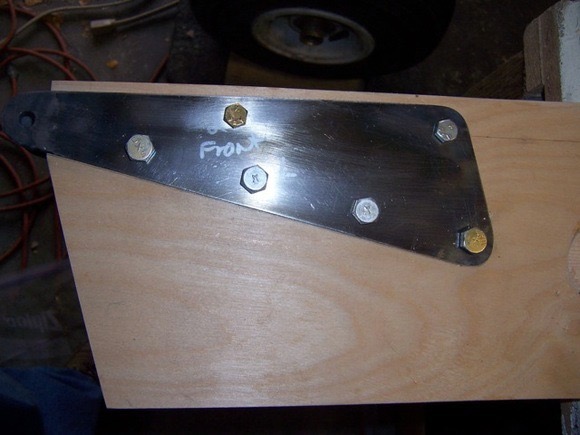
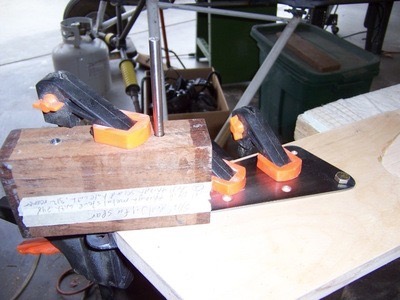
Drilling the wing spars proved to be a bit more than just getting out the drill or setting up the drill press. First of all, at 17′ long I could not use the drill press at all. The holes were critical to the attachment of the wing so every hole needed to be perfectly lined up with the steel fitting and they needed to be 90 degrees to the face so the bolts would go through both sides with out any binding. I decided to use a very typical drilling method so I made a drilling jig to drill the holes. The pictures will detail the process. First step was to locate the fitting on the spar according to the drawings. Next, I made the drilling jig from a 2″ thick piece of Walnut from my carving wood. I was working on the 5/16″ holes first so I needed a piece of 5/16″ tube for a sleeve to align the block to the jig and to center the first drill. I turned a piece of 3/8″ .065 tube down to the correct size using my belt sander. A lathe would have been much easier but I did not have access to one. I drilled a hole .308″ in the block an pressed the sleeve in place with the top flush and the bottom sticking out enough to go into the .090″ thick attach fittings. The sleeve would align the block and provide a guide for drilling. I first drilled out the tube to .248″ for the pilot hole. The block had a second hole reamed out to .312″ for the bolt hole. I was going to use a reamer for the .312″ hole as it gives a better finish than a drill bit. Now for some pictures:
 With
the fitting in its proper place on the spar, the block is set onto the hole
with the sleeve providing the alignment for the pilot hole.
With
the fitting in its proper place on the spar, the block is set onto the hole
with the sleeve providing the alignment for the pilot hole.
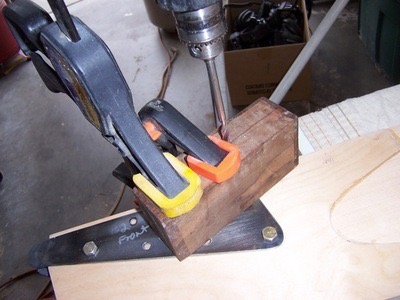
 The
block is clamped in place. I used a couple more clamps to hold the
fitting in place.
The
block is clamped in place. I used a couple more clamps to hold the
fitting in place.
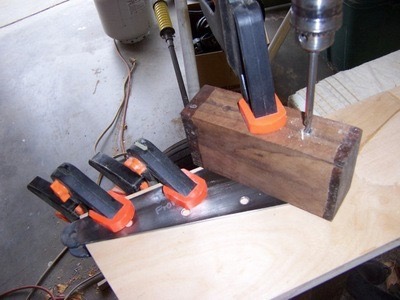 The first hole is drilled with .248″ piloted drill bit.
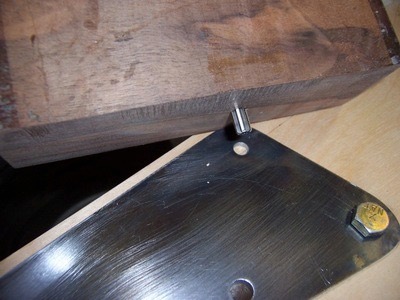
 You
can see how nicely this set up drills the first hole. The jig is then
positioned with the .312″ reamer in the second hole in the block and centered onto
the fitting. This reamer is used to drill the hole to size.
You
can see how nicely this set up drills the first hole. The jig is then
positioned with the .312″ reamer in the second hole in the block and centered onto
the fitting. This reamer is used to drill the hole to size.
 Above is the reamer being used to align
the block for the final hole.
Above is the reamer being used to align
the block for the final hole.
 This
is the reamer being used on the second hole in the fitting. After I
reamed the first hole, I placed a bolt in the hole and repositioned the jig
block for the second hole. The same process of align, drill, align with
reamer, and ream hole is repeated for each hole.
This
is the reamer being used on the second hole in the fitting. After I
reamed the first hole, I placed a bolt in the hole and repositioned the jig
block for the second hole. The same process of align, drill, align with
reamer, and ream hole is repeated for each hole.
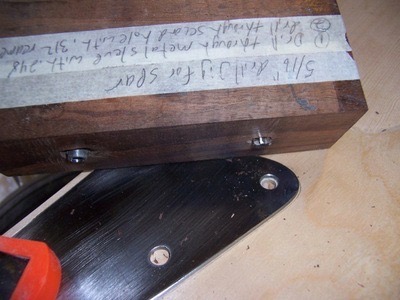
 With
the 5/16″ holes done, I took a second block of Walnut and drilled a
.250″ hole; first with the .248″ drill than used a .250″
reamer. I then used a .249 reamer to locate the block over the 1/4″
hole. I used a smaller reamer for alignment so it would slid through the
wood block easier.
With
the 5/16″ holes done, I took a second block of Walnut and drilled a
.250″ hole; first with the .248″ drill than used a .250″
reamer. I then used a .249 reamer to locate the block over the 1/4″
hole. I used a smaller reamer for alignment so it would slid through the
wood block easier.
 After
clamping in place, I drilled the hole with the .248″
piloted drill bit. With all the drilling and reaming, I am going through
both pieces of steel on top and bottom of the spar. After drilling I then
run the .250″ reamer through the block and into the spar for final sizing
of the hole.
After
clamping in place, I drilled the hole with the .248″
piloted drill bit. With all the drilling and reaming, I am going through
both pieces of steel on top and bottom of the spar. After drilling I then
run the .250″ reamer through the block and into the spar for final sizing
of the hole.
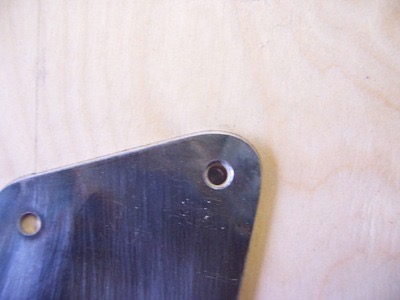
 Perfect
fit! All bolts fit the holes exactly. Last step is to remove
the fitting and ream the holes in the spar up to .316″ so
that when I epoxy varnish the inside of the bolt holes the bolts will still fit
through. The AN 4 bolts for the 1/4″ hole are small enough that I think
they will fit after the varnish. If not, I can ream larger and
varnish. DO NOT do the final reaming with the fitting in place as you
don’t want the hole in the steel to be larger than necessary. I will
repeat this process for each fitting. Note that the fitting I use for the
drilling needs to stay with that spar incase there are any irregularities from
one fitting to the other. My plan is to completely build up the wing and
fit onto the fuselage before drilling the attach fittings for the rear
spar. That way, I can jig the wing in place and get the angle of
incidence correct before final drilling of the attach holes. I was given
this tip from another builder and it makes sense to do final rear spar drilling
after the wings are hung on the fuselage for a test fitting. This
drilling method will be used for all holes needed on the spar. Next up
after a few more holes will be fitting the ribs in place.
Perfect
fit! All bolts fit the holes exactly. Last step is to remove
the fitting and ream the holes in the spar up to .316″ so
that when I epoxy varnish the inside of the bolt holes the bolts will still fit
through. The AN 4 bolts for the 1/4″ hole are small enough that I think
they will fit after the varnish. If not, I can ream larger and
varnish. DO NOT do the final reaming with the fitting in place as you
don’t want the hole in the steel to be larger than necessary. I will
repeat this process for each fitting. Note that the fitting I use for the
drilling needs to stay with that spar incase there are any irregularities from
one fitting to the other. My plan is to completely build up the wing and
fit onto the fuselage before drilling the attach fittings for the rear
spar. That way, I can jig the wing in place and get the angle of
incidence correct before final drilling of the attach holes. I was given
this tip from another builder and it makes sense to do final rear spar drilling
after the wings are hung on the fuselage for a test fitting. This
drilling method will be used for all holes needed on the spar. Next up
after a few more holes will be fitting the ribs in place.
Note: I decided tonight (12/21/09) to drill the rear spar attach fitting holes in the spar. I first checked the fuselage fittings and found the fittings to be within .3 degrees of each other so I felt ok going ahead with the drilling. Regarding the tip to tail length, I will make all measurements from the spar attach fitting bolt hole so I should be ok here. Time will tell if this is a good decision. If things were way off than I would need to make a new spar attach fitting to compensate for any gross irregularities.